WordPress: .com vs .org

For years I’ve built most of my sites using the open source WordPress platform, i.e. WordPress.org. For this site I decided to try the free offering of WordPress.com instead.

Setup

Setup is significantly easier on WordPress.com. If you already have a web host, setting up your own may not be much extra work, but if this first time setting up a website, there is always some degree of hosting configuration to go through before installing WordPress. I won’t detail those steps here and they will vary by the hosting provider, but at minimum you’ll need to pick a hosting provider, set up payment, buy a domain or point an existing domain to it, and install WordPress. It might be much more complicated like setting up databases, uploading the WordPress code yourself, and so on.

With the .com, you just say you want a new site, pick a domain, and you’re pretty much done. If you want to get up and going in a hurry, it’s a good way to go.

Typewriter with the word "WordPress" on it
Photo by Markus Winkler on Pexels.com

Configuration Options

The features you can use on a WordPress.com site varies depending on which plan you have. If you have only the free plan, like this site is (at least for now*), it is somewhat limited. It has WordPress.com ads which you won’t get any money from. You can’t use your own domain. You can’t add your own plugins. You can’t customize your own code. If you want to be able to do those things, you might be cheaper (but more work) looking elsewhere. But if you just want a personal blog like this, it’s enough, easy to use, and free.

*Update: soon after writing this, I started adding portfolio content and I don’t like the lack of flexibility in setting up those pages, so I am likely going to move to a self-hosted WordPress soon.

Check out the WordPress.com pricing page for all the details of pricing.

Maintenance

There is zero maintenance needed for a site hosted on WordPress.com, other than paying for your domain and/or paid account here. All of the software updates are handled for you and you don’t control things like the PHP version on the server.

If you’re hosting your own site, it is important that you maintain it. That means running the software updates on a semi-regular basis (at least every 3 months), updating the PHP version (about once a year) and testing to make sure it didn’t break anything, perhaps other hosting details like Plesk updates and security settings.

If you don’t want to worry about maintaining your site or paying a third-party provider to do it, then WordPress.com is a good easy way out.

Conclusion

Both approaches to WordPress are great. Which one is better for you depends on your needs and goal for the site.

Hosting your own WordPress site is great if you:

  • Have a host anyway or want to have a host anyway
  • Want to use all the features like editing your own code
  • Are prepared to do the maintenance work or pay somebody else to do it

On the other hand, using WordPress.com is great if you:

  • Want something free
  • Don’t need many features past having a public place to write
  • Don’t want to worry about maintenance

Security Essentials: Multi-factor Authentication

I typically have two main pieces of advice for basic information security that anybody can and should do.

  • Use multi-factor authentication everywhere it is offered
  • Use a password manager to generate good passwords, remember them, and make your life easier with auto-fill

I’ll look at the benefits of a password manager in another post soon. But first, let’s look at multi-factor authentication.

The idea

The idea of multi-factor authentication is that you prove you are who you say you are through an extra “factor” beyond just a password. This is because it is relatively easy for a password to be stolen, distributed, and used. If all it takes for somebody to get into your important accounts is a username and password, that’s a low barrier to cause a lot of damage, especially when you add that most people reuse the same passwords on multiple sites (more on that in the password manager post).

Verification options

The extra factor may be something you know like a security question or something you have like a fingerprint. This Microsoft doc breaks down the options in terms of what is available within Azure AD authentication, but most services offer some subset of those options.

At the lowest end of the security scale are security questions, which are essentially just an extra password except easier to guess. Many places including Microsoft don’t offer a security question option.

In the middle and the most common are SMS codes texted to your phone or voice calls made to your phone saying the code. That’s good enough for most people, but determined hackers can carry out sim-jacking to get through.

The highest end of the security scale is an authentication app on your phone (Microsoft Authenticator, Google Authenticator) or a dedicated security key device that must be plugged into your computer via USB (YubiKey). With these protections, a hacker would have to know your username and password AND also have your phone logged in to the authenticator app or the physical security key. That means they would have to physically rob you on top of cracking your password, which significantly cuts down on how many people can realistically pull it off. It also makes it likely you’ll notice before much damage is done.

YubiKey product line, from the YubiKey website

Using an authenticator app

The authenticator apps may sound like more work than a simple text, but it really is easier on top of being more secure. I use Microsoft Authenticator and that’s what I will be referencing specifically, but Google Authenticator and others have similar if not identical functionality.

Adding an account is simple. The hardest part may be finding the setting to enable it on the desired account. Some services make it obvious and strongly encourage you to enable multi-factor authentication. Others offer it but tuck it away in settings that you may not ever notice without looking for it. But once you do, if there’s an option to use an authenticator app, choose that and you’ll get a QR code.

In the top right corner of Microsoft Authenticator is a menu option with “Add account.” It then offers you the choice of a Microsoft personal account, a Microsoft work or school account, or other. The Microsoft option will allow you to set it up with a simple login, but all of the options allow you to scan the QR code. A quick point of your phone camera at your screen and you’re good to go.

The next time you try to log in and get prompted for the multi-factor – and it won’t typically be every time you log in since most services don’t prompt in low-risk scenarios like the same browser on the same computer at the same IP address as a login yesterday – then there are a couple of ways to verify your identity.

  • Microsoft accounts in Microsoft Authenticator will push a notification prompt and all you need to do is select the Approve button. The small risk in this scenario is that people get used to clicking Approve whenever it pops up and may do it without thinking twice when an attacker is trying to get in.
  • Otherwise you’ll need to copy the 6 digit code generated in the app into the web browser or app you’re trying to log into. These codes recycle quickly, generating new ones every 30 seconds, so it is virtually impossible for an attacker to guess the right one in time.

That’s it! It’s true that it is more work than just a password, but very little. You won’t have to do it often, mostly just when you use a new computer or phone. In exchange, you get a level of security that stops approximately 99.9% of attacks before they even get into your account. You won’t regret taking that bit of extra time to set up multi-factor authentication, but you will absolutely will regret it if you don’t and somebody gets into your account.

Security Essentials: Password Manager

I typically have two main pieces of advice for basic information security that anybody can and should do.

  • Use multi-factor authentication everywhere it is offered
  • Use a password manager to generate good passwords, remember them, and make your life easier with auto-fill

My previous post dealt with multi-factor authentication. This post will look at password managers.

Passwords are the worst

Why do you need a password manager? The short answer: passwords are the worst, but with a few exceptions, we still need them for everything. There are a few problems with passwords:

  • We need too many of them, so most people start reusing the same few passwords across multiple services. This opens a big security vulnerability: if the password for one service gets leaked, attackers will try the same username / password across lots of other services and get in to them all.
  • It’s hard to think of a good one that is both sufficiently random to keep attackers from guessing it and memorable enough that you won’t forget it when you need it again a year later. This leads to people making simple passwords like “password” or again using the same one across multiple services.
  • They’re annoying to type if you have all the random characters and symbols that are often recommended or required, especially in situations like a media app on a TV where you don’t get a full physical keyboard.
  • These problems are all amplified if you share the account with other people, like your Netflix account that the entire family needs to access.
  • They are a thin line of defense if they are the only thing keeping somebody out of your account. Even if the password is great, that’s still only one thing that anybody from anywhere could guess and break in.

The last one is dealt with by multi-factor authentication. Most of the others – other than the typing on TV scenario – are dealt with by a password manager.

The password manager solution

The gist of the idea of a password manager is that you only need to remember one password to get into your password manager account, and that account remembers all your other passwords. That solves the memory problem.

Most if not all password managers also include a feature that will generate random passwords for you, storing them to the password manager all in one step. That solves the picking unique strong passwords problem.

Security tab
Photo by Pixabay on Pexels.com

Most if not all password managers have browser extensions and auto-fill in apps on phones. You don’t have to look up the password and copy/paste it over. You just click on the right account from your password manager and it fills it in for you. You never even need to look at the password for the account you’re logging in to, let alone remembering it and typing it out. That solves the annoying to type out problem.

Most if not all password managers have some mechanism for sharing those passwords with others. If one person changes the password, everybody gets the update and will auto-fill with the new one without ever even knowing it was changed. That solves the shared accounts problem.

Most password managers come with some other tools that also help boost your password security:

  • Identifies if you’ve used the same password on more than one service. If you already had repeated passwords, this helps you find them.
  • Identifies which services offer multi-factor authentication, to help encourage you to enable it. Some even function as a code generator themselves and will auto-fill the code for you, although I personally prefer the extra work of having a separate authenticator app.
  • Identifies if any credentials have been leaked, as found on haveibeenpwned.com. If any credentials show up here, you need to change them immediately – on everywhere with that password, not just the one that leaked it.
  • Identifies weak passwords that have low levels of randomness and could be easier for an attacker to guess or brute force.

Getting started

Most of the password managers have some level of free trial with limited functionality. That’s a great way to get a sense of what it is like to use one before you commit to spending on a particular service.

Personally, I am now using 1Password. It offers all of the things I have mentioned above, in a friendly user interface and a reasonable monthly price.

Before that I used the free version of LastPass. For a long time it had the best free offering by far, but that has been scaled back since.

Then I used Enpass, which functions a bit differently. Instead of everything sitting in their secure cloud that you pay for on a monthly basis, it instead sets up your password vaults in your existing cloud services like OneDrive or Dropbox and syncs through that. It’s nice in that there’s only an up-front fee, not a monthly one, but needing to set up separate vaults in separate cloud services did make for a hassle trying to share with others.

Take your time trying out some different services to find what fits your workflow best. But the most important thing is simply that you start using one regularly and take advantage of what it offers so you get unique, strong passwords that you no longer have to memorize. Plus, unlike multi-factor authentication that makes logging in a bit more complicated occasionally, a password manager is both more secure and saves you a lot of time and mental energy.

Microsoft Ignite News Day

Today was the first day of the spring edition of Microsoft Ignite, the primary conference for Microsoft IT professionals. The first day always includes a lot of news for upcoming features which tend to get dumped all at once the same time as the opening keynote. After reviewing several of these news blogs and watching video sessions most of the day, here are the features which stand out to me. I will not cover nearly everything, but provided some links for more details.

Microsoft Mesh

This was the key product in the opening keynote. Many of us have now spent most of a year straight only communicating with our coworkers through screens. Together Mode in Teams certainly helped as it showed everybody together – it’s less cognitive load and does make it feel just a little bit like you’re together – but it’s still staring at a flat screen. But what if instead we all entered a shared virtual reality or augmented reality space, where we could still access our shared resources like files from our Microsoft 365? That would be a significant improvement to the meeting from home experience. Microsoft Mesh promises that kind of future.

Mesh is a platform, not a specific product at this point. It allows developers to create applications where we can share holograms and appear as avatars speaking to each other. They didn’t promise any particular implementation of this technology, but along with the meeting idea they did also have some fun like playing Pokemon Go in the park with your HoloLens headset on.

Microsoft Teams

Teams had several feature announcements, as it often does.

Within meetings:

  • Dynamic view: this has been shown before but the flexibility will make larger meetings more pleasant and easier to focus on what you need.
  • Encryption: end-to-end encryption on 1:1 video calls. That means your company or Microsoft couldn’t see your calls even if they tried.
  • Presenter mode: when presenting a PowerPoint, you can choose whether to keep your own overlaid on top of the presentation. That will make it a lot easier for viewers to still see you, helping with things like joke delivery which I have found can be quite awkward in one-directional virtual presentations.
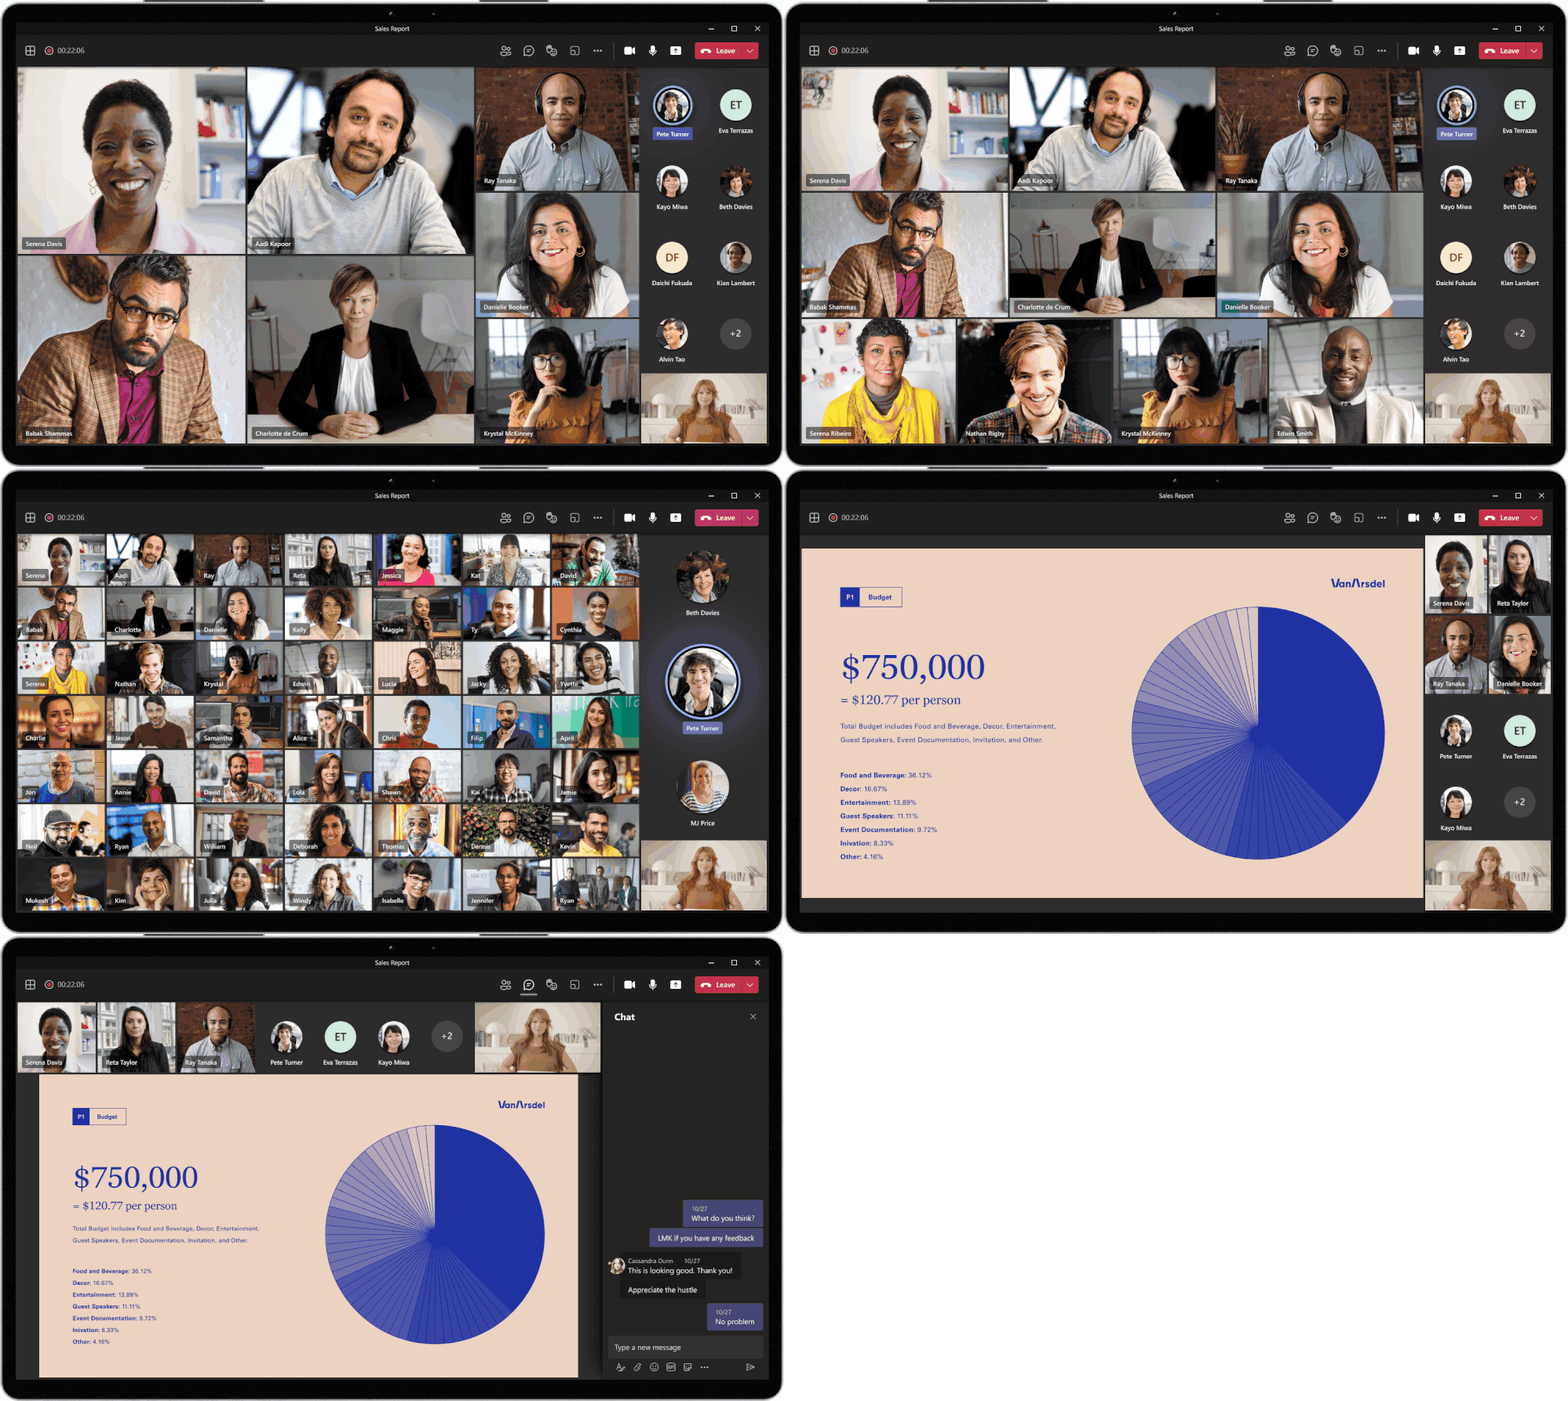
Dynamic view demo, from the Teams announcement blog.

There are also new webinar capabilities to allow for public registration to an event, email reminders going out to those attendees, and moderation tools.

Teams Connect allows for sharing Teams channels with other organizations. I’ll need to see exactly how this works, but it was high on the list of improvements many wanted to improve interaction with clients and partner organizations.

Multi-geo support will allow for different Teams data to be housed in different regions, helping meet data residency requirements for large organizations with offices in different countries.

Endpoint transfer on calls will allow you to transfer a call seamlessly from one device to another. Get a call at your desk but need to finish on your phone as you leave the office? No problem, and the others on the call won’t notice.

Planner

Planner now supports up to 25 labels, a big jump from the previous 5. This is helpful to better organize your tasks.

Power Platform

There are two big announcements for Power Platform that stood out to me.

Power Automate Desktop is now free to any Windows 10 users. Previously this required a separate license. This allows you to automate all kinds of things you do on your computer, not just cloud services. If you find yourself doing some repetitive tasks, check this out as a possible way to save yourself that time.

Power Fx was first hinted at a week or two ago, but it is the simple programming language inspired by Excel formulas and now being deployed throughout the Power Platform. That’s going to add a lot of programming potential with syntax that a lot of people are already familiar with from Excel.

SharePoint Syntex

SharePoint Syntex is a relatively new tool for automating classification and data extraction from files. A few new features include:

  • A find function: when you’re training your identification model, this will make your life a lot easier to jump to the relevant data to trying to tell the model to pay attention to, rather than having to scroll through long documents. It’s a little addition that can add up to a lot of time saved.
  • Retention labels: automatically applied when the content type is identified
  • SharePoint hubs: content types can now be assigned to SharePoint hubs. This will allow for changes to content types to roll out much faster to sites within the hub. The delay to roll out was always one of the more annoying factors when using content types, so this should help significantly.

Project Origin

This one is outside of the Microsoft 365 space but was still a good sign to me. Microsoft is partnering with some other companies to combat online misinformation through tools like identifying deepfakes. Misinformation on social media is one of the largest problems facing our world at the moment, so it’s promising to see that Microsoft is trying to help.

Microsoft Viva Topics – User Experience

In my previous post, I walked through my thoughts on the configuration process for the new Microsoft Viva Topics functionality within Microsoft 365. In this post I’ll dive into what the experience is like for users once it is configured.

Creating / Editing a Topic

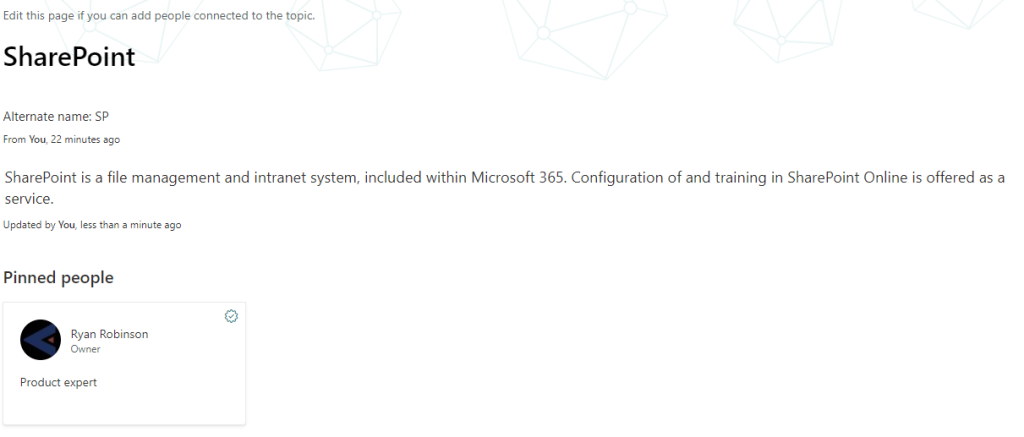
You can edit a topic page similar to editing any other SharePoint page, but there is a lot less flexibility. It has a predefined set of features and you cannot add other web parts.

  • Title
  • Alternate names: this allows for the topic being surfaced for alternate names, not just the core title. A suggestion here is to add any acronyms for the topic that you’re likely to use in normal conversation.
  • Short description: a bit of text to summarize the topic.
  • Pinned people: identify users in the organization who are relevant to the topic, with a title for how they are related, such as “topic expert.”
  • Pinned files and pages: if there are files and pages on other SharePoint sites that are particularly important to this topic, you can pin them here for easy access.
  • Related sites: similar idea, but for SharePoint sites.
  • Related topics: links to other topics, visualized in a way to help you see how all your topics connect to each other.
Demo of the top portion of a topic page

Surfacing Topics

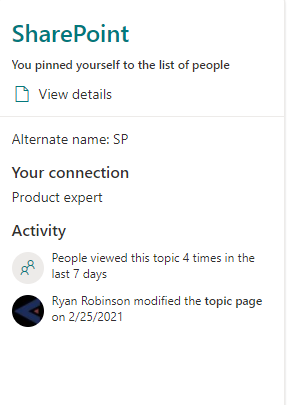
Currently the surfacing of topics for users is limited to only SharePoint pages. When you hover over the linked topic title, you see a hover card very similar to what you see when a person is referenced.

This should expand over time to also show up in other Microsoft 365 resources, such as in emails and Teams conversations. It’s moderately useful now, but once it also starts showing up in this more organic contexts for conversation, that will be a huge additional value.

Use Cases

A few scenarios come to mind where this topic functionality could be great.

If you are a client-oriented business, you could use a topic as a landing page for each client. Alternate names could be acronyms or shortened versions of the client’s name. Pinned people could be an account manager or project manager who often works with the client. Related files may be the most important files for the client, such as a contract, and related sites may be other SharePoint sites in your system that contain data like a project’s files.

A product or service oriented business could be similar, with a topic card for your major products. Pinned people would be the experts on that product.

Internal documentation would also work as topics. The detailed steps would need to be files that are held elsewhere, but they can be linked from the topic card. For example, if you offer Drupal website consulting, you may have detailed documentation on the SharePoint site for the team responsible for Drupal website consulting. Then you create a Drupal topic card, which has links out to the detailed documentation.

In all of these scenarios, there is clear value to being in the middle of a SharePoint page (or later, a conversation) where a topic is referenced and you are able to quickly get to more information about that topic through a pop-up card.

Conclusion

Note that my tests are missing one of the most compelling aspects of Viva Topics: the automatic creation and updating of topics pages. My tenant consisting of just me doesn’t have nearly the scale to easily manufacture that test. All of my tests relied on manually creating topic pages.

With that gap in testing acknowledged, even if the automatic component isn’t as strong as promised, I really like Viva Topics. The idea of being able to surface important topics in other places through Microsoft 365 promises a pleasant user experience that saves a lot of time in accessing important information.

MS-101 Prep: How I’m Studying

Over the last few months, I’ve been working on preparing for the MS-101 exam. This exam covers a few topics around enterprise device management and security. I’ve mostly been studying with a few methods:

I’m adding another piece: writing about it. One of the best ways to learn something is to try to explain to somebody else in your own words. So with that, I’m starting a new series on what I’m learning as I study for the MS-101.

Microsoft Viva Topics – Configuration

Microsoft recently launched their new Viva platform. Nothing about the announcement was radically new – everything had at least been previewed – but the new Viva branding helps tie them together with the shared goal of improving the employee experience.

The most interesting component for me is one piece that did launch that day: Topics. In this post and the next I’ll break down my first impressions from some simple tests.

Configuring

The announcement blogs about Viva Topics did not make it clear how to get started. It also isn’t obvious; unlike some of the larger workloads in Microsoft 365, there is no new Viva Admin Centre. Fortunately it is clear in documentation elsewhere where to get started in the main Admin Centre.

Once you find the process, it’s straightforward with some useful options, such as:

  • SharePoint sites: you can specify to look for topics on all sites, all sites except those specified, only those specified, or not at all. In most cases, all sites will make the most sense. Don’t worry about permissions as it already utilizes the Microsoft Graph to make sure that nobody sees content they shouldn’t.
  • Exclude topics: if you know some topics that you don’t want in advance, you can upload a csv file with those. You’ll always have manual control over topics, though, before they get published. If you just let it find everything it can and then remove them from there, that’s also fine.
  • Who can see topics: you can allow the topics functionality for all users, only selected users, or nobody. This feels like a redundant setting to me as there is also an extra license needed to see topics.
  • Who can manage topics: you can allow editing topics as well as adding new topics to different permission groups. You can leave this open for everybody, but in this case most larger organizations will want to restrict it to a handful of dedicated admins determined by a security group.
  • Topic centre: name and pick the URL for your new topic centre, a special SharePoint site. You may want this to be generic like “Topic Centre” or you may want something more specific if you are going to use it for a more precise purpose like a client listing.

When you’ve picked all the desired settings, confirm that you’re ready and the features will be enabled. Note that it took an hour or two after completing this setup before the topic centre was ready for my use. That makes sense, but it doesn’t warn about that delay; if you are confused why it doesn’t seem to be working right away, you likely just need to wait.

Topics configuration settings, after the initial wizard

The Topic Centre

The Topic Centre which is created after the setup process above looks like a typical SharePoint site, but with some specific page types. The homepage shows topics related to you. The Manage Topics page is the core feature for administering topics on an ongoing basis. This page shows all of your organization’s topics, broken down by the stage of approval:

  • Suggested: topics found by the automatic search for you to review. The question to move from this stage is whether you do want that to appear as a topic across your organization. If not, you can remove it. If yes, you can confirm it.
  • Confirmed: topics which have been confirmed as a real topic of interest for your organization. For items here, take the time to view the page and make some manual edits to the topic before publishing.
  • Published: topics that are active within your organization and can be seen by typical users with the appropriate license and settings.
  • Removed: topics that have been removed from your organization.
Sample of topic centre

This is the hub for your Topics admins to keep things organized. I found it clean and intuitive to use. I imagine in large organizations that there will need to be somebody regularly checking in on the generated topics and keeping things organized, but the tool to do that is straightforward enough that the technology won’t get in the way.

Overall, it’s off to a great start. In the next post, I’ll talk about what this looks like for typical users seeing the topics within their workflows.

Design a site like this with WordPress.com
Get started